A fuse costs under a dollar. Having a shop find and change one costs $50 to $120. This is the easiest job on the whole site.
Nothing to lift, nothing to drain, nothing that can hurt you if you follow the one rule below. If a single thing has stopped working — the radio, the cigarette lighter socket, the interior lights, one power window, the horn — a fuse is the first place to look and it costs nothing to check.
The one rule
Turn the ignition off before you pull a fuse, and never replace a fuse with a bigger one.
A 15 amp fuse is in that slot because the wiring behind it is rated for 15 amps. Put a 30 in and you have not fixed anything — you have moved the weak point from a one-dollar fuse to the wiring loom, which is a far more expensive repair and a real fire risk. Same number, every time. And never a coin, a nail, or a strip of foil.
What you need
- A replacement fuse of the same amp rating — well under a dollar, and an assorted pack is about $8. Buy the pack; you will use it again.
- The little plastic fuse puller that clips inside most fuse boxes. If yours is missing, needle-nose pliers work — grip the plastic body, not the metal.
- A flashlight, or your phone.
- Optional but handy: a 12 V test light, about $10, which finds a blown fuse without pulling any of them out.
Step 1 — Find the fuse box
Most cars have two, sometimes three:
- Inside the cabin — usually under the dash on the driver’s side, behind a pop-off panel near your left knee. Sometimes in the side of the dash that only shows when the door is open, sometimes in the glovebox or under it. This one handles the interior: radio, lights, windows, sockets.
- Under the hood — a black plastic box, usually near the battery, with clips on the lid. This one handles the engine, cooling fans, headlights and the bigger loads.
If you cannot find it, search your year, make and model plus “fuse box location.” Your owner’s manual has it too, in the section most people never open.
Step 2 — Read the diagram
The inside of the lid has a map of the box: a grid of little rectangles, each labelled with what it protects and its amp rating. It will be small, abbreviated, and often printed in grey on black. This is what the flashlight is for.
Labels are abbreviated in ways that are mostly guessable — CIG or PWR OUTLET for the lighter socket, HAZ for hazards, RR WIPER for the rear wiper, ACC for accessories. If the thing that stopped working is not listed by name, look for the system it belongs to. If your manual is missing, the same lid diagram is usually findable online for your exact model.
Take a photo of the diagram with your phone before you start. Far easier to read pinched-and-zoomed on a screen than upside down under a dashboard.
Step 3 — Find the blown one
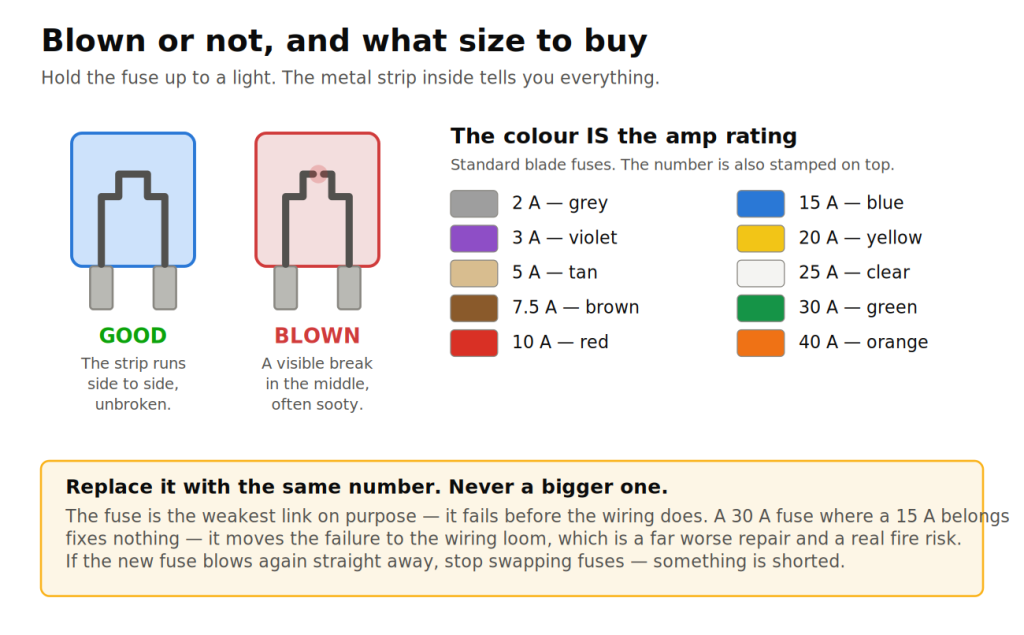
Ignition off. Pull the fuse the diagram points at, straight up, using the puller. Hold it up to the light and look at the metal strip running between the two prongs.
- Unbroken strip — the fuse is fine. Put it back and the problem is elsewhere.
- A visible gap in the middle, often with a small sooty smudge on the plastic — that is your blown fuse.
Some fuses fail in a way that is genuinely hard to see, with a hairline crack rather than an obvious break. If you are not sure, that is what the test light is for: with the ignition on, touch its probe to each of the two little metal test points on top of the fuse. Light on both, the fuse is good. Light on one side only, it is blown. That method also lets you walk the whole box quickly without pulling a single fuse.
Step 4 — Put the new one in
Match the number. Blade fuses are colour-coded by rating as well as stamped with it — 5 A tan, 10 A red, 15 A blue, 20 A yellow, 30 A green — so the colour is a quick sanity check that you have grabbed the right one. Push it firmly straight down until it seats, put the cover back on, and test whatever had stopped working.
If it works, you are done. Total cost, well under a dollar.
If the new fuse blows straight away
Stop. Do not put a third one in, and absolutely do not put a bigger one in.
A fuse that fails immediately is not a worn-out fuse — it is doing its job, and something downstream is drawing more current than it should. That usually means a chafed wire shorting to the body, a failing motor, or water where it should not be. That is a real diagnosis and it is worth paying someone for; chasing it with a bag of fuses is how a small electrical fault becomes a burnt loom.
A fuse that blows again after a few days or weeks is the same story, more slowly. Worth mentioning to a shop rather than living with.
A few things worth knowing
- Fuses do not wear out on a schedule. One that blows had a reason, even if the reason was a one-off surge. Two in the same slot is a pattern.
- A relay is not a fuse. Relays are the taller cube-shaped things in the same box. A dead relay produces similar symptoms and is also often a simple swap — frequently you can swap in an identical relay from a non-critical circuit to test it.
- Two things dead at once often means one shared fuse rather than two faults. Check the diagram for what else is on that circuit.
- Keep the assorted pack in the glovebox. A blown fuse is the kind of thing that strands you in a parking lot, and it is a two-minute fix if you have the part.
Information only, not professional advice. See the disclaimer.