This is the job that pays for the whole tool kit. It is also the job where getting it wrong has the worst consequences. Read the whole page before you start.
Brakes are the one system where a mistake shows up later, at speed, with your family in the car.
Never work under a car held up by a jack alone — jack stands every time, on solid level ground, with the other wheels chocked. And if at any point you are not confident the job is right, stop and have it inspected before you drive it. A brake job you are unsure about is not a saving.
Is this your job?
Honestly: this is an intermediate job, not a first one. If you have never taken a wheel off, do an oil change and a battery swap first and come back to this.
- Time: 2 to 3 hours for a first attempt on one axle. Do not start at 8 p.m. on a car you need at 7 a.m.
- Difficulty: the steps are simple. Seized bolts and rusted-on rotors are what turn it into a bad afternoon — more likely on an older car that has seen Illinois winters.
- Have a fallback. If it defeats you halfway, the car is not drivable. Know how you would get it to a shop.
Skip it and use a shop if: the brake pedal goes soft or to the floor, there is fluid leaking anywhere near a wheel, the car pulls hard under braking, you have an electric parking brake on the axle you are doing (many need a scan tool to retract), or you are working on a steep or soft surface with nowhere flat to park.
Signs you actually need them
- A high squeal that stops when you brake — that is the wear indicator doing its job. Time to plan the work.
- Grinding — metal on metal. The pads are gone and the rotors are being damaged now. Stop putting it off.
- Pulsing pedal or a shudder through the wheel when slowing from speed — usually warped or unevenly worn rotors.
- Looking at them: through the wheel spokes you can usually see the pad against the rotor. Less than about a quarter inch of friction material — roughly the thickness of two stacked quarters — means replace.
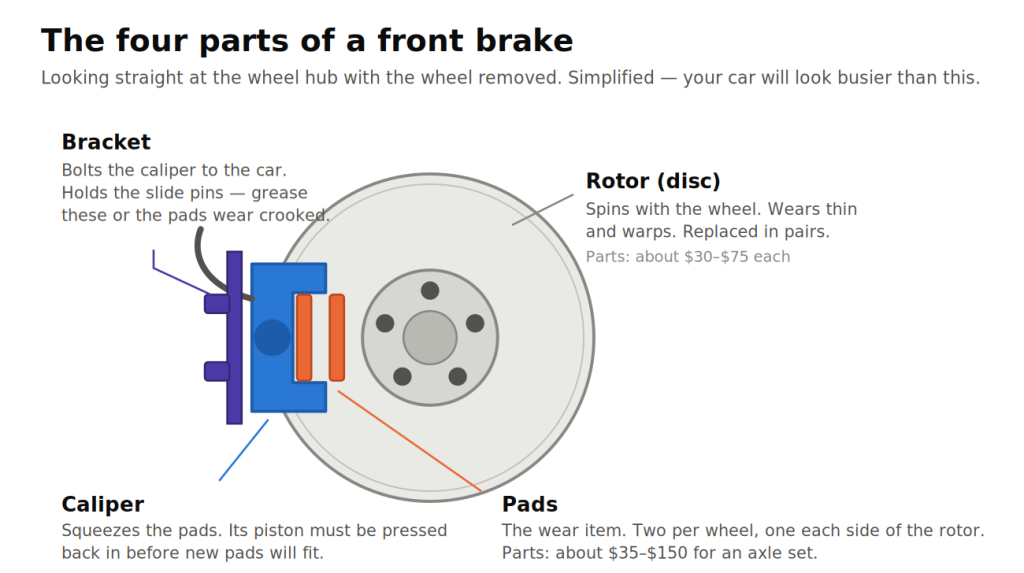
Know the four parts before you start
Parts and tools
Buy for your exact vehicle
- Front brake pads, axle set — $35–$150
- Front rotors, pair — $30–$75 each. Replace in pairs, never one side.
- Hardware kit (clips and shims) — $10–$20. Cheap, and reusing crushed old clips is a common cause of noise.
- Brake grease and brake cleaner — $15 for both.
Give the counter your year, make, model, engine and trim. Brakes vary between trims of the same car far more than people expect.
Tools
- Floor jack and jack stands, plus wheel chocks
- Socket set and a breaker bar
- Torque wrench — not optional on this job
- C-clamp or caliper piston tool
- A bungee cord or wire to hang the caliper
- Penetrating oil, gloves, eye protection
Look up two numbers for your car before you start and write them on your hand: the lug nut torque and the caliper bracket bolt torque. You will need them at the end and you will not want to be searching with greasy hands.
The job, step by step
- Park flat, engine off, parking brake on, chock the rear wheels. Flat and solid. Not a sloped driveway, not gravel, never grass.
- Crack the lug nuts loose while the wheel is still on the ground — a quarter turn each, no more. Trying this in the air just spins the wheel or pushes the car off the stands.
- Jack the car at the manufacturer’s jack point, then put jack stands under the proper support points and lower onto them. Give the car a firm shove. If it rocks on the stands, put it down and start again. Leave the jack lightly in contact as a backup.
- Take the wheel off. Lay it flat under the car’s sill as a second backup.
- Photograph everything before you touch it. Every clip, spring and pin, from two angles. You will want this in an hour.
- Remove the two caliper slide bolts (the smaller pair, at the back of the caliper) and slide the caliper off the rotor. It will be snug — rock it gently, do not lever against the rotor face.
- Hang the caliper from the spring with the bungee. Never let it dangle on the brake hose — that hose is not a rope, and a damaged one is a fluid leak waiting to happen.
- Lift the old pads out of the bracket and note which way round they sat, especially any wear sensor.
- Remove the two bracket bolts (the larger pair, into the steering knuckle) and take the bracket off. These are tight — this is what the breaker bar is for.
- Pull the rotor off. Some have a small retaining screw. If it is rusted on, penetrating oil and a few firm taps with a rubber mallet around the hat usually free it. Some rotors have two threaded holes for jacking screws — a bolt threaded into each pushes the rotor off. Never hammer on the friction surface.
- Clean the hub face down to bare metal with a wire brush. Rust here is a leading cause of a brand-new rotor that pulses. Do not skip this.
- Wash the new rotor with brake cleaner. New rotors ship with an oil coating. It must come off.
- Fit the new rotor and hold it against the hub with a lug nut finger-tight so it cannot shift.
- Refit the bracket and torque the bolts to spec. Clean the slide pins, grease them with brake grease, and check they move freely. Seized pins are why one pad wears out twice as fast as the other.
- Fit the new hardware clips and put a thin smear of brake grease on the pad ears and the back of the pads — never on the friction surface or the rotor. Fit the new pads.
- Compress the caliper piston with the C-clamp or piston tool, pressing against an old pad so you do not damage the piston. Go slowly. Check the brake fluid reservoir as you do it — the fluid has to go somewhere and it can overflow. (The cleaner way is to open the bleeder screw while compressing so the old fluid goes out rather than back through the ABS unit. If that is beyond where you are today, just watch the reservoir.) Note: many rear calipers must be screwed in with a wind-back tool, not pressed.
- Refit the caliper over the new pads and torque the slide bolts.
- Do the other side before the car comes down. Both sides, always.
- Wheel back on, nuts finger-tight, lower the car, then torque the lug nuts to spec in a star pattern. Not an impact gun, not “as tight as it goes.”
- Pump the brake pedal before you move the car. The first few presses will go straight to the floor — that is the pistons taking up the gap. Keep pumping until the pedal is firm and high. Driving without doing this means no brakes at the end of the driveway. Then check the fluid level.
Bedding them in
New pads and rotors need to mate before they work properly. On a quiet road with nothing behind you: about six moderate stops from roughly 40 mph down to 10, then a few more, then drive gently for ten minutes without dragging the brakes. Avoid coming to a complete stop and sitting with the pedal pressed while they are hot — that prints pad material onto the hot rotor and is what people mistake for a warped rotor later.
Expect them to feel slightly soft for the first day or so. Expect the pedal to go to the floor, or a burning smell that does not fade, or any pulling — those are not normal, and mean stop driving and check your work.
The mistakes that catch people
- Driving off without pumping the pedal first. The most dangerous one on the list.
- Hanging the caliper by its hose.
- Not cleaning the rust off the hub face.
- Grease on the friction surface.
- Guessing at lug nut torque — too loose loses a wheel, too tight warps the rotor you just paid for.
- Reusing tired hardware clips and then chasing the squeak for a month.
- Doing one side only.
What you saved
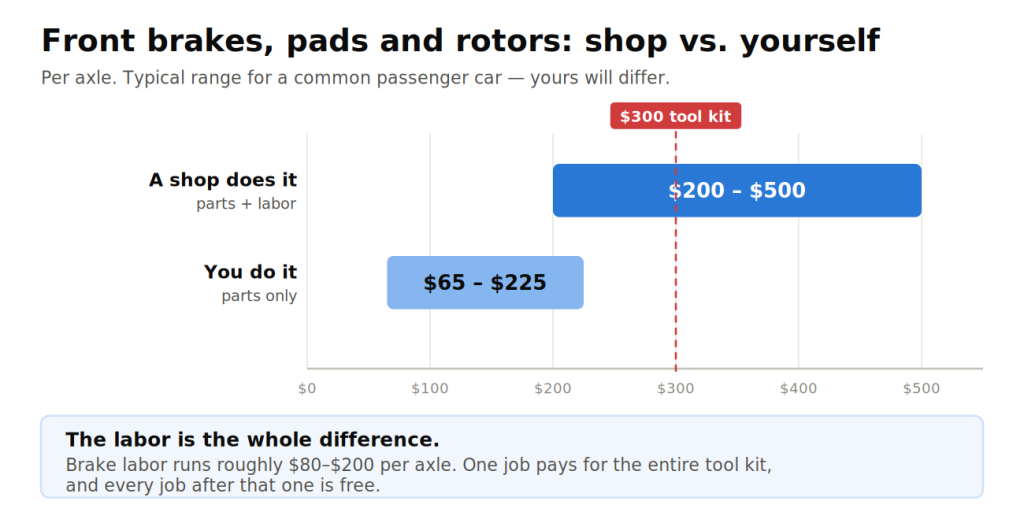
Brake labor is roughly $80 to $200 per axle. That is the money that stays in your pocket — and it is why this one job covers the cost of the entire tool kit, with the tools still sitting in your garage afterwards.
Information only, not professional advice, and no substitute for your vehicle’s service manual — which always takes precedence over anything written here. Work on your own vehicle is at your own risk. See the disclaimer.